How To Fix The Overhead Squat
Strength & ConditioningABOUT THE AUTHOR

Jason Sayler
// Why is the Overhead Squat so Difficult?
The Overhead squat, which will be referred to primarily as OHS for the rest of this article due to my 5 words per minute hunt and peck style of typing, is a perfect combination of mobility and stability. A 45 pound OHS can humble the strongest athletes very quickly if they do not possess the mobility. The most mobile yoga master can be squished by the same relatively light weight if they are not stable enough to support the load through the full range of motion.
I am no mobility guru and to be honest I have had a little bit of a hard time buying in to the whole mobility, Functional Movement Screening craze that seems to be sweeping the fitness nation. What I do buy into is plain and simple hard work, and the few mobility exercises that have worked for me and numerous other athletes I have worked with. If you follow my Dynamic Athlete programming at Train Heroic I do not necessarily include OHS into every week but snatches are common place and the OHS is the foundation of that movement. If you want a better OHS, you need to spend a lot of time OH Squatting. It is that simple. If you are looking for a quick fix, I would recommend that you stop reading right now. However if you are in it for the long haul, here is a look at a few of the techniques that work.
// Overhead Squat Problem #1: ankle / hip mobility
Have you noticed that when you attempt your OHS that your toes turn out as you get lower in the squat? If so your ankles are not dorsi flexing enough to achieve the proper depth and your body is finding a way to accomplish what you are asking of it by spinning the toes out and most of the time this will be at the cost of the knees caving inwards, the weight shifting towards the ball of the foot putting excessive strain on the medial side of the knee. This will cause your performance to suffer due to instability and the inability of the posterior chain to fire in this poor position. It will put the strain primarily on the quads and can cause overuse injuries overtime.
Does your low back round and butt tuck under at the bottom of your squat? This will create a unstable position and a potentially harmful position when loaded. When the back rounds, it essentially turns off the glutes and hamstrings in the bottom of the squat. These large muscle groups need to be incorporated into the movement if large loads are the intent. You could probably squat 45 pounds all day with your low back rounding at the bottom, but 245 pounds would be a whole different story. The bottom of your squat will be the point where your low back starts to round until you can gain the mobility in the hips and ankles and the stability in the lumbar spine to squat all the way to the bottom.
The Fix:
Grab ahold of a rack or other solid object for balance and squat down to the bottom of your squat keeping your back flat. Now one side at a time shift your weight forward flexing ankle as much as possible. Be sure that the heel stays down, and the knee moves forward (not in) out over the toes. Spend at least 2 minutes every other day working on this and you should see a noticeable improvement within 2 weeks or less. This can also do wonders for tight hips. While you are in the bottom, use your elbow to push the knees out, stretching out the adductors and use the rack to pull your hips toward your ankles in the bottom. Work hard to keep your back flat.
// Overhead Squat Problem #2: Torso Position
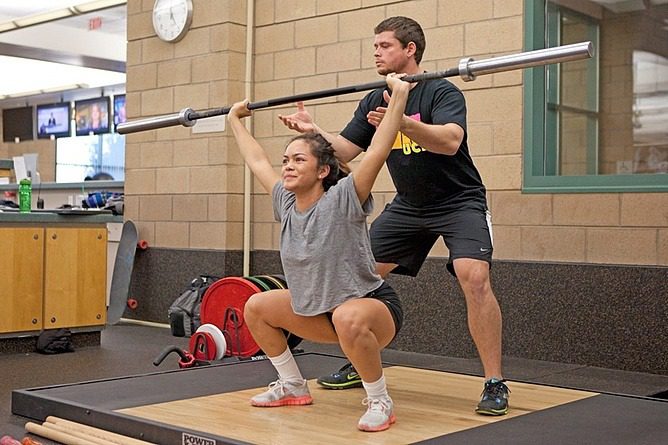
Forward leaning torso, armpits facing the floor, toes flared out. Not so good. At least he seems happy.
You begin your squat with the bar overhead in a perfect position, arms straight, torso completely vertical, armpits facing forward, shoulders packed in and then as soon as you begin to lower your body down your arms rotate forward and your armpits end up facing the ground.
This can put your shoulder in a compromised position placing a large amount of the strain on the anterior side of the joint and not to mention the major cause of you dumping most of your weights in front of you. You can probably get away with this when the weights are light but as soon as they become substantial enough you will not be in a position that is capable of supporting the load. This is most likely not due to the mobility of the shoulder or lack there of, but the torso angle changing from completely vertical when standing to much farther forward as you begin to squat.
The Fix:
There is no easy fix here, it is just going to take hard work. Take a light bar or PVC pipe and put it overhead in a perfect position. Torso should be vertical, arms should be straight, and armpits should be facing straight ahead. Face a mirror and begin the slowest squat of your life. Move down at literally an inch a second and as soon as you start to see your armpits rotating down towards the ground stop and come back up. Assume the perfect overhead position again and then squat again. Fight to stay vertical. You should be able to get a little lower with each rep, even if it is just a 1/2 inch each time, take it. Once you reach a point where there is no more noticeable improvement or fatigue has set in to the point where you can no longer hold a good position, take a break. Repeat this process 3 times every other day and you will gain the ability to stay vertical in your squat and keep your shoulders healthy.
// Overhead Squat Problem #3: Tight Shoulders and Upper Back
If you are forced to use an extremely wide grip when Overhead Squatting and find it challenging to get in a good overhead position even when standing at the top of the squat, your upper back, chest and shoulders may be so tight as to not allow for good OHS movement.
The Fix:
Take a lacrosse ball, baseball, tennis ball or some similar round object and lay down on it. The ball should be on the muscles between your scapula and your spine. Put as much of your body weight on the ball as you can stand without crying and start to make snow angels. Do 3-5 repetitions in one spot and the move the ball down an inch or two. Start at the top of your traps and work your way down on both sides. If your pectorals are tight, this same process can be done by laying flat down on top of the ball starting where the pec and the deltoid meet. This active release method can do wonders for loosening up the musculature needed for a successful OHS. In my experience, the change is only temporary, so if this works for you, it may need to be done before each workout that requires overhead movement.
Are you a better coach after reading this?
More coaches and athletes than ever are reading the TrainHeroic blog, and it’s our mission to support them with useful training & coaching content. If you found this article useful, please take a moment to share it on social media, engage with the author, and link to this article on your own blog or any forums you post on.
Be Your Best,
TrainHeroic Content Team
HEROIC SOCIAL
HEROIC SOCIAL
TRAINING LAB
Access the latest articles, reviews, and case studies from the top strength and conditioning minds in the TH Training Lab